Dear Reader,
As part of my blog, I have to outline my process when designing my website which is worth another 45 percent for my module. So, it is as follows:
1) Revising the Theory, Notes, and Brief:
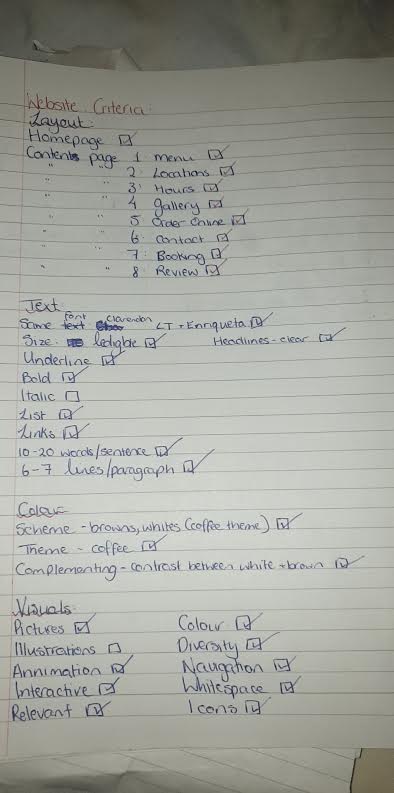
The first logical to me was to revise my notes that I had taken over the past few lectures about web-design. My notes referenced how to use text, colour, and pictures effectively. When I studied these notes, I complied a checklist of what I needed to cover on my site; i.e.: using lists, using the active voice, multimedia, various typefaces, etc. I then revised the brief and made a note of what the lecturer wanted from the site.
2) Platform:
The second step was to choose the website I wanted to choose to make my website. I had no experience with creating a website so this step was vital to me. I had experience with ‘Google Sites’ in my lab and did not like it at all, I found it to be complex and confusing. I have tried ‘WordPress’ for my blog but I couldn’t imagine myself using it for a website. My last option was to use ‘Wix’. I loved this site. It was so easy to use and I liked the layouts they offered me.
3) Plan for Website:
My third step was to brainstorm my website. I started by listing the businesses I could create a website for like, a café, a clothes shop, a school etc. Then once I chose a coffee shop I decided to list my aesthetic including colours, texts, and images. I referred back to my brief and saw that I had to have at least eight pages of content so I listed the pages of content I could do. This included; Home, Menu, Gallery, Review, Contact, History, Opening Hours, Products, and Locations. I also researched similar establishments like Starbucks and Costa to ensure my page felt authentic.
4) Implementation of the Design:
The fourth step was the implementation. For this, I ensured to keep referring to the notes I made so I implemented the theory I learned in my lectures. I adjusted my brainstorm accordingly so I wouldn’t forget if I had changed an idea. I also decided to use ‘Pexels’ as then it would not be complicated with copyright as these photos are stock photos. This also meant I didn’t need to link them to the owner, but I have got the practice of how to do it from this blog.
5) Reviewing and Submission:
When I finally felt I had done all I could do, I gave the domain to three people of varying degree of technology knowledge. I gave them the website to look through then asked them a series of questions and asked them to look through the website for the answer. These questions included: “What can you order off the menu?”, “What are the opening times of the café?” and “How would you book a table?”.
There were a few complaints of some pages not being user friendly which I then changed. Once the participants had done that task, I asked them about the general use of the website. I asked for their opinion on the theme, media, interactive elements, and colour scheme. I listened to complaints and compliments and adjusted the website accordingly.
Once satisfied with my changes, I saved the address of the site and logged into SULIS to submit it. After this, I took a huge sigh of both relief and anxiety.
This was the process I used to research, design, review and submit my assessment of a creation of a website.
– Aishlin